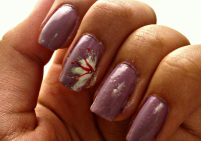
Flower Mani
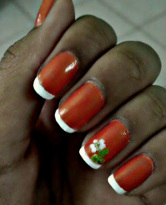
This look was very easy to create. I started off with two coats of Twinkle from Pure Ice, then I got regular construction tape to help keep a straight edge for the white tips (Hard to Get by Sally Hansen). When I put the construction tape on my fingernails, I made sure it wasn't too sticky so it wouldn't peel off the nail polish along with it. By doing this, I applied the tape to the back of my hand, then I peeled it on and off several times. Then, using that same piece of tape, I stuck it on my nails to do the tips. When I removed the tape, no nail polish had peeled and the tips came out perfect.
When I had finished, my nails looked somewhat plain to me. So I decided to add a simple flower to my ring finger. For the stem and leaves, I used Show Me the Way by Sinful Colors and Wild Thing by Pure Ice. I sorta mixed them together for a different color. The petals are the same color as the tips, but for the little gold dot in the middle (sorry, can't remember what it's called at the moment) I used Gold Glitter by L.A. Nails. I Was Bored . . .
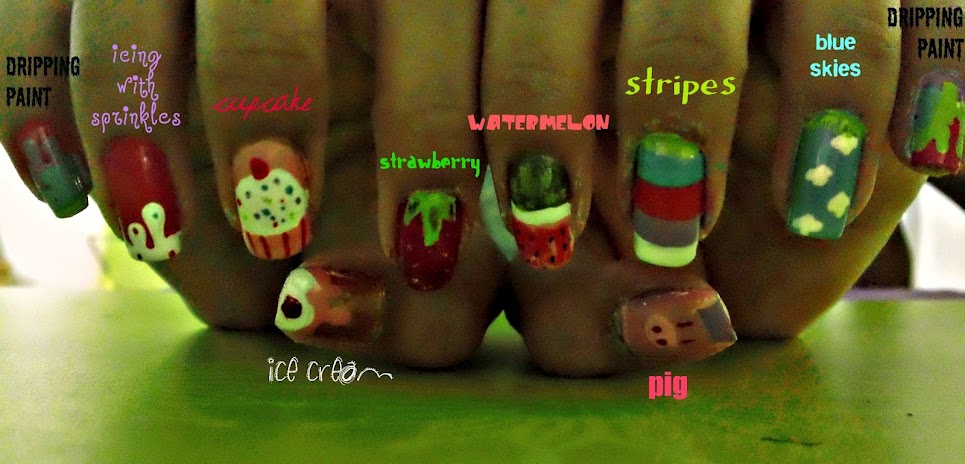
When I did this look, I wasn't in a mood for the 'typical' kind of feel. I wanted to go a little different and have each finger nail painted with something completely irrelevant to each other. I used over 10 different colors for this, so I'll just list them off (it's easier):
|
My Private Collection . . .
Click here to see my latest creation, Rugrats!
A Sneak Peek . . .
Lime Retro
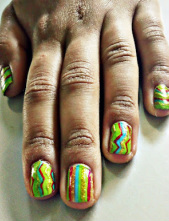
This look took me a while to create. It was quite simple, though. It consists of simple stripes and zig-zags. Very easy!
I used Wild Thing by Pure Ice for the base. For the gold, I used Gold Glitter from L.A. Colors and I also used Pink Crush for the pink lines from L.A Colors, as well. The color of the blue stripes is also from L.A. Colors (Sea Foam Green). After I had the base coat, I just painted simple stripes. Done! |
Icing w| Sprinkles
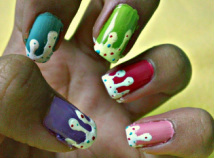
I had a lot of fun creating this look. At first I was just going to do them all in fuschia, but then I decided to mix it up a bit and make each nail a different color. For this look I used Hard to Get by Sally Hansen, Club Prive by L'Oreal, Wild Thing by Pure Ice, Flirt Alert by Pure Ice and Love by Pure Ice.
Making the dripping icing effect is actually easier than it looks. You start off with a glob of nail polish (but not too big), then gently move it up making the ends look like a ball. Then you fill in the tips. Tape isn't really needed to do this, that's how simple it is. To be honest, it's harder to explain than it is to actually do. The next time I do something like this, I take step-by-step pictures for you guys. Abstract Firework
Sort of a last minute look, I decided to go simple. For the base, I applied No Hard Feelings by Sally Hansen. Two coats of that color and you're good to go.
Moving on to the middle finger, I used Hard to Get by Sally Hansen and Pink Crush by L.A. Colors. For the white, I vaguely had any nail polish on the brush. That was what gave the nail a sort of airbrushed effect. For the pink lines, three quick swipes and you're done. But if you want a little bit of extra shine, you could add silver glitter around the edges (L.A. Colors). Barely noticeable, but bold. Peanuts
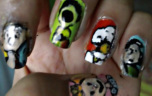
Inspired by Nail Nerd, I really wanted to try this out. It was a first, I have to admit. I have never done cartoons before on my nails. It was a challenge, but it was really fun to do. For the colors, I used Tweet Me by L'Oreal, Club Prive by L'Oreal, Fantasy Pink by Tea, Black Heart by Sally Hansen, Copper by L.A. Colors, L'Orange by L'Oreal, Show Me the Way by Sinful Colors and Hard to Get by Sally Hansen.
|
Add me on Muzy | Check out my blog | Try these fun and easy tutorials | Have a nail art idea? Share it with me | Check out my nail art gallery | Latest look
